Google App Engine support
This section assumes that you already read the tutorial (the Optimizing section specially), and that you are a bit familiar with Google App Engine.
The main idea is to take advante of Google’s cloud computing services to optimize your strategies, which is specially helpful when you don’t have access to a cluster of computers to optimize your strategies in parallel.
In order to follow the steps described in this section you’ll need:
- The Google App Engine SDK for Python installed (https://developers.google.com/appengine/downloads).
- A Google App Engine account (https://appengine.google.com/).
Once this is in place, the next steps are:
- Creating an application inside Google App Engine.
- Uploading your application.
- Uploading bars.
- Running the strategy optimization.
All the commands in this tutorial assume that you’re inside the directory where you extracted the PyAlgoTrade package.
To create an application, you first have to log in to your Google App Engine account. Once inside, hit the Create Application button. You’ll need to pick an Application Identifier. For this tutorial I used pyalgotrade-tutorial and for the rest of the settings I used the default values. Note that you’ll have to pick a different, unique Application Identifier to create your application. So, whenever you read pyalgotrade-tutorial keep in mind that you have to replace that with your own Application Identifier.
Next, you’ll use the updateapp.py script to upload your app. Note that you need to supply your Application Identifier as well as the path were your app.yaml resides:
python googleappengine/tools/updateapp.py --app_id=pyalgotrade-tutorial --app_path=googleappengine/app
updateapp.py uses the appcfg.py utility from the Google App Engine SDK for Python, so you’ll be asked for your email and password. If appcfg.py is not in the PATH, then you’ll need to supply the –appcfg_path parameter too. The output should look like this:
Updating app.yaml
Preparing pyalgotrade package
Updating application using appcfg.py
Application: pyalgotrade-tutorial; version: 1
Host: appengine.google.com

Starting update of app: pyalgotrade-tutorial, version: 1
Getting current resource limits.
Email: YOUR_USER_NAME_HERE@gmail.com
Password for YOUR_USER_NAME_HERE@gmail.com:
Scanning files on local disk.
Could not guess mimetype for resources/rw_common/themes/realmacsoftware06/png/pngbehavior.htc.  Using application/octet-stream.
Could not guess mimetype for resources/rw_common/themes/realmacsoftware06/png/pngbehavior.htc.  Using application/octet-stream.
Cloning 34 static files.
Cloning 24 application files.
Uploading 9 files and blobs.
Uploaded 9 files and blobs
Compilation starting.
Compilation completed.
Starting deployment.
Checking if deployment succeeded.
Will check again in 1 seconds.
Checking if deployment succeeded.
Will check again in 2 seconds.
Checking if deployment succeeded.
Deployment successful.
Checking if updated app version is serving.
Completed update of app: pyalgotrade-tutorial, version: 1
Uploading index definitions.
Uploading task queue entries.
This basic application that you just uploaded includes the RSI2 strategy from the tutorial section.
Next, you’ll download 3 years of daily bars for ‘Dow Jones Industrial Average’:
python -c "from pyalgotrade.tools import yahoofinance; print yahoofinance.get_daily_csv('dia', 2009)" > dia-2009.csv
python -c "from pyalgotrade.tools import yahoofinance; print yahoofinance.get_daily_csv('dia', 2010)" > dia-2010.csv
python -c "from pyalgotrade.tools import yahoofinance; print yahoofinance.get_daily_csv('dia', 2011)" > dia-2011.csv
and then upload those to your app with the following command:
python googleappengine/tools/uploadbars.py --instrument=dia --url=http://pyalgotrade-tutorial.appspot.com/remote_api dia-2009.csv dia-2010.csv dia-2011.csv
uploadbars.py uses the appcfg.py utility from the Google App Engine SDK for Python, so you’ll be asked for your email and password. If appcfg.py is not in the PATH, then you’ll need to supply the –appcfg_path parameter too. The output should look like this:
Loading bars from dia-2009.csv
Loading bars from dia-2010.csv
Loading bars from dia-2011.csv
Writing intermediate csv into /var/folders/3W/3WD8TM0IEhCchht8mudSQ++++TM/-Tmp-/tmpRvLGvE
Uploading /var/folders/3W/3WD8TM0IEhCchht8mudSQ++++TM/-Tmp-/tmpRvLGvE
Uploading data records.
[INFO    ] Logging to bulkloader-log-20120615.231426
[INFO    ] Throttling transfers:
[INFO    ] Bandwidth: 250000 bytes/second
[INFO    ] HTTP connections: 8/second
[INFO    ] Entities inserted/fetched/modified: 20/second
[INFO    ] Batch Size: 10
Please enter login credentials for pyalgotrade-tutorial.appspot.com
Email: YOUR_USER_NAME_HERE@gmail.com
Password for YOUR_USER_NAME_HERE@gmail.com:
[INFO    ] Opening database: bulkloader-progress-20120615.231426.sql3
[INFO    ] Connecting to pyalgotrade-tutorial.appspot.com/remote_api
[INFO    ] Starting import; maximum 10 entities per post
............................................................................
[INFO    ] 758 entities total, 0 previously transferred
[INFO    ] 758 entities (840720 bytes) transferred in 38.0 seconds
[INFO    ] All entities successfully transferred
Note that this command requires 3 important things:
- The instrument’s symbol for the bars that you’re about to upload.
- The url for your application’s remote api.
- The cvs files that you want to upload
Now that you have your application deployed into Google App Engine and some bars available, you should be ready to queue a strategy execution. Try opening http://pyalgotrade-tutorial.appspot.com/ in a browser and login with your Google App Engine credentials. It is possible that you get an error that says:
The index for this query is not ready to serve. See the Datastore Indexes page in the Admin Console.
This is because Google App Engine is still building your application indexes. The only thing you can do at this point is to wait. In my experience, it took less than 10 minutes.
Once inside, click on the strategies.rsi2.Strategy link. Next, click on Queue a new execution. Complete the form with the following values:
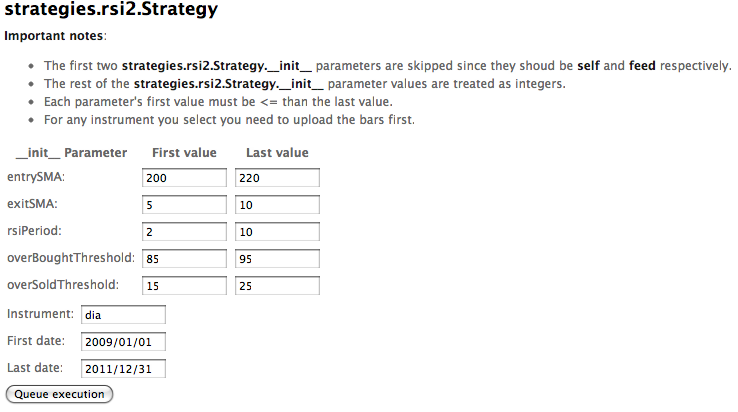
After filling in those values, click on Queue execution and you should get redirected back to the strategy page like this:
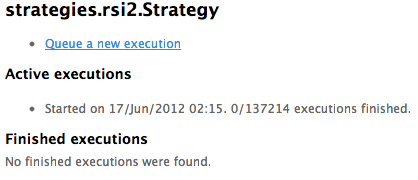
This page lists the active and finished executions, and in this case your first execution has just started and 0 out of 137214 executions have finished. If you refresh the page a couple of minutes later you should see:
- The number of executions that have finished.
- The best result found so far.
- The set of paremeters that yielded that result.
20 minutes later or so, the strategy finishes executing and you should see that the best result found was 2260.7 with parameters [204L, 5L, 2L, 91L, 19L].
Google App Engine gives you a certain amount of free resources to use each day, and this strategy execution used 50% of those. So, if you execute this one more time you’ll consume all of your free daily quota and you’ll have to wait 24hs to use the web application again. Another option would be to enable billing to go beyond the free quota.
As a reference, it took me 3hs using the pyalgotrade.optimizer.local module get to the same results in my dual core 2Ghz notebook.
Adding new strategies is really easy. All you have to do is follow 3 simple steps:
- Add the .py file with the strategy into googleappengine/app/strategies.
- Export your strategy by updating googleappengine/app/strategies/__init__.py.
- Update your application using the updateapp.py as described above.
Before uploading your strategy I’d recommend that you run it locally first to avoid having it fail inside the Google App Engine thus wasting resources unnecessarily.
Known bugs/limitations:
- The pyalgotrade.talibext.indicator module is currently not available when running inside the Google App Engine. This is because it depends on external libraries (talib) that are not available in that environment.